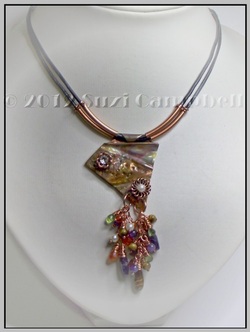
By Wire Jewelry Artist - Suzi Campbell
Working Safely with Metals
December 2011
In light of a recent Article I came across regarding using Galvanised Steel in the making of Jewellery items, and a subsequent Forum posting I did concerning it, I felt a short article was in definite need concerning working safely with metals.
Jewellery making is a wonderful thing to do – it makes pretties that we all ogle at and go “oooh & ahhh” over, and we admire and ultimately feel we must have!..lol
But, like a lot of things in this world – there are also loads of hidden dangers in the making of jewellery, especially when you start applying certain conditions, elements and techniques into it, like the application of heat on certain metals and the effect of doing so.
And yes – whilst the effects of heating up metals can produce visibly stunning and brilliant results, it is the unseen dangers that lurk that we need to be aware of and exercise extreme caution with, and strictly adhere to for the health and safety of not only the person making the item – but also for anyone or any living creature within close proximity to what is being done.
There are various metals out there that when heat is applied to can produce toxic fumes that can, and has been extremely harmful to one’s health. In fact when precautions weren’t adhered to – it has been fatal.
In a nutshell NEVER!! apply heat of any kind to Galvanised Steel – in fact I will go further to say – don’t use Galvanised Steel for ANY! wearable Jewellery item.
Galvanised Steel is impregnated with Zinc to help stop rust – and trying to remove the outer layer of Zinc won’t get rid of it. It’s still in the metal, and therefore can “leach” into the skin and cause health issues.
I am not going to profess to be an expert – but I do have considerable knowledge having members of my family who are Science teachers and a Son who is a Metal Fabricator to know that you don’t mess around with combining certain chemicals nor do you ignore the fact when certain metals have heat applied to them they will give off toxic and in some instance fatal fumes.
WORKING SAFELY Ok - so you've established you want to proceed in working with metals and incorporate applying heat to the metal.
You may wish to go all out and cut up some metal sheet and apply heat to it to solder other metals to it. Or you may even wish to apply certain patinas or pastes or even inks to things.
First thing is - do the extra products you're wishing to add come with a Fact sheet? Do they have warning labels? Do you need extra equipment to help keep you and your household safe?
Whatever it may be that you're wishing to do - one thing is for sure.....you need to remember your 3 ”R’s” – Research – Read and Remember.
Research whatever you can find on what you’re doing
Read everything you find on what you’re doing, and the most important –
Remember - take any and all precautions suggested in what you’re doing.
Play it safe and you will enjoy your craft tenfold.
PRECAUTIONS IN WORKING WITH METAL
Creating is fun and should be fun, and as said - get into a routine of "cleaning up" properly after you've finished is just another part of it all.
If you are ever in doubt about the reactions of metals when either heat is applied or chemicals and other products are used on them - ASK QUESTIONS! - Especially from experienced people who are in the know and able to give you accurate answers.
Above all - enjoy being Creative by exercising care...
In light of a recent Article I came across regarding using Galvanised Steel in the making of Jewellery items, and a subsequent Forum posting I did concerning it, I felt a short article was in definite need concerning working safely with metals.
Jewellery making is a wonderful thing to do – it makes pretties that we all ogle at and go “oooh & ahhh” over, and we admire and ultimately feel we must have!..lol
But, like a lot of things in this world – there are also loads of hidden dangers in the making of jewellery, especially when you start applying certain conditions, elements and techniques into it, like the application of heat on certain metals and the effect of doing so.
And yes – whilst the effects of heating up metals can produce visibly stunning and brilliant results, it is the unseen dangers that lurk that we need to be aware of and exercise extreme caution with, and strictly adhere to for the health and safety of not only the person making the item – but also for anyone or any living creature within close proximity to what is being done.
There are various metals out there that when heat is applied to can produce toxic fumes that can, and has been extremely harmful to one’s health. In fact when precautions weren’t adhered to – it has been fatal.
In a nutshell NEVER!! apply heat of any kind to Galvanised Steel – in fact I will go further to say – don’t use Galvanised Steel for ANY! wearable Jewellery item.
Galvanised Steel is impregnated with Zinc to help stop rust – and trying to remove the outer layer of Zinc won’t get rid of it. It’s still in the metal, and therefore can “leach” into the skin and cause health issues.
I am not going to profess to be an expert – but I do have considerable knowledge having members of my family who are Science teachers and a Son who is a Metal Fabricator to know that you don’t mess around with combining certain chemicals nor do you ignore the fact when certain metals have heat applied to them they will give off toxic and in some instance fatal fumes.
WORKING SAFELY Ok - so you've established you want to proceed in working with metals and incorporate applying heat to the metal.
You may wish to go all out and cut up some metal sheet and apply heat to it to solder other metals to it. Or you may even wish to apply certain patinas or pastes or even inks to things.
First thing is - do the extra products you're wishing to add come with a Fact sheet? Do they have warning labels? Do you need extra equipment to help keep you and your household safe?
Whatever it may be that you're wishing to do - one thing is for sure.....you need to remember your 3 ”R’s” – Research – Read and Remember.
Research whatever you can find on what you’re doing
Read everything you find on what you’re doing, and the most important –
Remember - take any and all precautions suggested in what you’re doing.
Play it safe and you will enjoy your craft tenfold.
PRECAUTIONS IN WORKING WITH METAL
- 1. Always read labels thoroughly prior to using any chemicals required for your craft
2. Always work in a well-ventilated area
3. Always ensure small children, the elderly, people with respiratory ailments and pets are not present or near areas you are using chemical mixes in
4. Do not have food or drinks in any area you are using chemicals in or are grinding, sanding or machine polishing metals.
5. Never use appliances nor utensils that will then be used for food consumption
6. Always wear the appropriate safety gear - Dust mask - Goggles - Leather gloves when using flames - grinding, sanding or polishing items
7. Never wear synthetics when working with flames or mixing chemicals. Certain synthetics can create high charges of Static Electricity - mixed with flames - this can cause explosions - when mixing certain chemicals the electric charge can also create explosions or react with the chemicals.
8. Always clean up your work area once you have finished. Vacuum work benches and floor areas - then wipe down any work surface and tools with a disposal cloth that has been sprayed with cleaner.
9. ALWAYS! change your clothes and wash your hands under running water prior to soaping up as soon as you have finished your work and before patting a pet - or cuddling your kids.
Creating is fun and should be fun, and as said - get into a routine of "cleaning up" properly after you've finished is just another part of it all.
If you are ever in doubt about the reactions of metals when either heat is applied or chemicals and other products are used on them - ASK QUESTIONS! - Especially from experienced people who are in the know and able to give you accurate answers.
Above all - enjoy being Creative by exercising care...
Article - Making Jump Rings in a Flash

APRIL 2011
HOW YOU CAN OMIT THE "V"!
For years now I've been making my own Jump rings and have tried various methods when it comes to cutting them...most with success however many that were time consuming to say least!
Setting them up in a clamp system and cutting them with a Dremel or Fine Saw blade was ok - but to me was time consuming in the setting up process and wasn't portable....plus if you didn't have a handle on the Dremel it would "chew" through the metal in places you didn't want!
So I inevitably went back to doing the double cut method and have done ever since - which can be very tedious to say the least!!
But as my little motto says "We do what we do with what we've got to get the result we need!" :)
I know a lot of people would be saying - "Why don't you just go buy ready-made ones!??".well that's true too...and I have done in the past only to find that the wire used wasn't sturdy enough for the jobs at hand...and - I also found that there were at the time only a select few sizes available...so hence making them myself!
I got the desired diameters I was after - I could make them on the fly..and whilst it was in a way more time consuming doing them - it actually worked out cheaper because there was no end mark-ups etc. Plus if you buy your wire in bulk like I do - or are fortunate enough to be given heaps of it like I have been - then hey making your own makes sense huh!? :)
Now I've also seen people rave about Dave Arens(?) Koil Kutter - which was on my list of tools to get - but have now put that on hold as being in Australia postage is always an issue - plus trying to find an up-to-date email address hasn't been forthcoming.
So I've again scoured the net looking for something that was portable - affordable - easy to use and non-fussy in it's set-up but still couldn't find anything matching what I was after....plus I also wanted another pair of Flush Cutters so kept looking round.
Now I know we all have our favourite brands when it comes to tools...some swear by Lindstroms...but at the price range they start at out here in Australia they were out of the running - plus you could almost feed a small nation with the amount charged!!..lol
So in my travels one day I was in a Hobby shop looking for an affordable decent pair of Flush Cutters and came across the Xuron brand of cutters and shears....and ended up buying 3 pairs!
One being the flush cutters and the other 2 being Shears - one a more heavy duty pair - the other finer for thinner sheet or scrim.
Picture below shows the 3 pairs I purchased...and it's the middle pair that I've discovered cut Jump rings in a breeze and without having to do double cuts to get rid of V ends or the like...BONUS!!!

Now I'm not wasting "iddy-bitty" ends of metal - which add up considerably when making heaps of rings...plus I can sit at my leisure on the couch cutting rings..or even pack it into a small container and take it anywhere to cut them AND! they cut BEAUTIFULLY!! WOOT!
Hope this helps those also looking for ways to cut their own Jump rings with ease. :)
Happy Creating!!....Suzi
Hope this helps those also looking for ways to cut their own Jump rings with ease. :)
Happy Creating!!....Suzi
Article - Homage to a Master
APRIL 2011
JAMES LLEWELLYN
Back in April of 2010 I did a post – this one - http://www.jewelrylessons.com/gallery/homage-master-updated - to pay Homage to Jim Llewellyn as I am a firm believer that this man is responsible for bringing the wire wrapping we know today to the fore.
Many would argue the point saying that the likes of C.G.Oxley and Alexander Calder were the ones to do so – but for those who aren’t on the know….C.G.Oxley only did the wire wrapping during WW1 as a way of occupational therapy to help soldiers…and of course for them to make something to send home to their girlfriends, wives or mothers. He also saw it as a way to make something very basic that appealed – what could be more appealing than having your name written in wire in a pin or a bracelet?..- so many were made and sold to the masses.
As for Alexander Calder - he was more well-known for his sculptures paintings and mobiles….rather than wire wrapping, and even though he produce nearly 2,000 pieces of jewellery, the jewellery he did produce had a more modern look to it almost taking on the look of a "sculptured" piece of Art.
But it was a young Jim Llewellyn who saw the potential for this craft …so taking his family and relocating in Canada – he set about to change the “homemade” jewellery we know today and started honing his craft with different ways of “bending” wire.
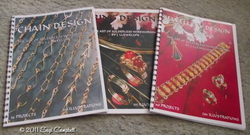
The Llewellyn’s produced several books from his designs….one being “Ring Designs”, another “Chain Designs” and yet another one “Jewellery Designs” which is filled with all kinds of things – bracelets, rings, pendants, etc….all from tutorials that Jim wrote way back in the early 1960’s and 70’s.
I highly recommend anyone wanting to take up this craft to get these books…..but – be prepared though!....they don’t have glossy photos and heaps of text like you might be used to on tutorials of today….but they do have easy to follow instructions and diagrams on how to make what you see.
These books are still available today – but not in general book stores – nor are they available through online book sites etc….save if someone is selling a 2nd hand copy. The only place you will get these from is the Llewellyn’s site – The Amulet. To be honest – I couldn’t understand why someone would sell their copies – unless of course they were giving up making Jewellery – but these are a definite must have in your book library.
The Llewellyn’s were also responsible in helping get the wonderful “The Wire Artist Jeweller Magazine” up and running.
To Jim Llewellyn – and the likes of other “old” Masters – ie Tom Phelan, Jorgen Greftegreff, Ed Sinclair and Jim Fowler…..thank you….without your dedication and willingness to share your skills many would not be where they are today – me included.
Article - Recycle - Renew - ReUse
DECEMBER 2009
No Supplies?....then Recycle!!
Anyone who was hit by "The World Economic Crisis”, would realize that for some of us buying certain materials at this time of year may have to be put on the back burner until the festive season is over as we all watch our spending.
I’ve noticed over the last few weeks through other forums others have written about being a bit tight for spare cash to pursue their jewellery addiction *cough*…sorry I mean passion. (lol for me they are one in the same word!) - so I thought I’d share some tips on how you can have beautiful wire in next to no time…Copper wire that is, and in all sorts of gauges too.
Lucky for me my father taught electronics – so would have all sorts of gizmos and gadgets from time to time – some of them old transistor receivers with transformers in them that yield glorious copper wire, and now that he no longer wants/uses them they have come into my possession.
I was also thought of when a dear neighbour passed away and in cleaning out his shed again an abundance of various gauges of copper wire was discovered, and again it came into my possession - some of the wire is so fine there is no number available on a wire gauge reader for it….it is hair fine – great for doing Peruvian style pendants!
Also - out here in Australia we have what is called a “Hard rubbish” collection that takes place twice a year whereby everyone throws out all their unwanted or broken bits and pieces, and believe me it is amazing what you come across.
Now I can already hear some of you saying “Eeew!…fancy going through the rubbish”…well that’s not quite what I do – if someone is throwing any broken electrical pieces out I ask them if they mind that I take any wire from it….the answer is always – “Go for it – it’s junk lady”.
Little do they know!!…– “One mans junk is another mans treasure”!!!
So you can imagine how absolutely tickled pink, purple, etc, etc I was when I came across a man throwing away some 40mtrs of unwanted coaxial cable!! – yep – 131 ft of it – or some 44 yards. Now unearthing the copper wire in a coaxial cable isn’t a piece of cake – the hardest part is slicing through the inner plastic coating surrounding it – but after some 10minutes of messing around with a piece just over 1mtr long there was the most beautiful 18g copper wire you could feast your eyes on!! The same chap even had an old set of jump leads for a car, which I also took, and they have approximately 70 individual wires to one lead of approx 34g copper wire in it.
I will do the maths for you – 2 leads @ 70 wire per lead = 140 wires of approximately 2mtrs lengths = 280mtrs!! - that’s 918ft or 316yds - Why wouldn’t you accept it and use it!!???
I felt like a kid in a candy shop, and that all my Christmas’s had come at once when I worked out exactly how much 18g and 34g copper wire I would yield for – mm let me think – oh yes – the only thing it would cost is my time to strip it down from the outer casings – otherwise it cost NOTHING!!!!
Now I don’t know about you – but the last time I checked prices for Copper wire 18g @ approx 8yds (7mts) was around $8AUD and for 32g (only equivalent I could find) @ approx 24yds(22mtrs) was around $6AUD - so all up I saved approximately $123 by asking if I could get someone else’s cast off!
So next time you need some copper wire – take a look around you first.
Are you about to throw away an old toaster, iron or some other type of electrical equipment that has seen better days?
Does your next-door neighbour have any old transistor type radios around that are no longer used and just gathering dust?
Are there any construction sites near you with skip bins in them with off cuts of electrical wire in them that if you asked you’d be able to take?
You could reap huge rewards in beautiful wire just by asking, and at the same time you are doing your bit towards recycling, reusing and renewing by making a beautiful handcrafted item from it…and all it will cost you is a bit of your time and energy…. but your wallet will love you!
I hope this may help you....wishing you a safe and happy Christmas & a prosperous New Year
Happy creating - Suzi
Article - Beginning Your Jewelry Journey
OCTOBER 2009
Some Do's & Don'ts
to help you get started
Ok so you've made the decision to "have a go at jewellery making" - but are probably thinking where to start and are also wondering the how's - do's - don'ts.
If it's anything I can recommend to the "Novice"...don't buy expensive tools & wires to start with. Some will disagree with me here - but this is how I see it. I taught Art classes for a number of years and the worst thing I saw were people outlaying heaps of money on the most expensive brushes - paints etc...and half way through a class they decided that learning to draw wasn't for them..yet they had spend a couple of hundred dollars on equipment they weren't going to use again!! In a nutshell - a waste!
I also teach Jewellery making and view this as being no different!
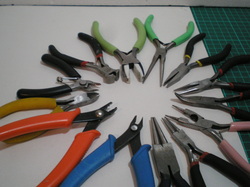
1/. Buy an inexpensive set of pliers - even if you decide later that jewellery making isn't for you - the plier set will come in handy at some stage or another for that odd job around the house. A good functional set will comprise the following
- Round nose pliers
- Chain pliers
- Flat nose pliers
- Cutters (the most common cutter in sets are Side cutters - don't be fooled into thinking they are Flush Cutters - because they aren't. A flush cut will cut the wire flush on both sides - whereas Side cutters cut 1 side flush & the other has a "V" shape to it!)
2/. Get yourself some practise wire - the cheaper & more inexpensive the better - (I even suggest to people to get 20g fencing wire and practice with it) - There is nothing worse than spending a small fortune on expensive wire & botching the project up!
3/. Practice - Practice - Practice!!!
Also forget about buying certain jigs etc when you start up...learn how your pliers alone can make any loop - ring - shape - just by practising!! Also other tools like mandrels etc can be easily subsituted with bits of dowel - knitting needles etc. Just a simple case of using ones imagination.
To this day I still use fencing wire to make a prototype for certain projects just to make sure it will work...if not - well hey - no major expense forked out....And - I still don't own any expensive tools/mandrels/jigs etc! My partner cringes when I make a bee-line to his tool box and take off with certain long screwdrivers to use as mandrels!!..lol
The only add-ons to my tool supplies when I decided I was going to get serious about Jewellery making have been a very simple plastic square jig (cost about $10.00AUD) & a pair of plastic coated pliers(cost approx. $13.00AUD) The plastic pliers are a must when using on expensive wire as they won't leave scratch marks. The pair I have whilst cheap are still in action after 2yrs so thats $13.00 well spent in my books! In the picture are some of the "tools" I use - the strange looking contraption is wonderful! and acts as a spare couple of hands...so as not to scratch wire - I wrap the claws with thin felt. the "Mandrels" are (believe it or not!) wooden chopsticks - hard cardboard roll and the end of a craft knife that broke..lol
I am looking to start doing Tutorials soon - and will being sharing some of them for FREE!.
Happy Creating!......Suzi
Some Do's & Don'ts
to help you get started
Ok so you've made the decision to "have a go at jewellery making" - but are probably thinking where to start and are also wondering the how's - do's - don'ts.
If it's anything I can recommend to the "Novice"...don't buy expensive tools & wires to start with. Some will disagree with me here - but this is how I see it. I taught Art classes for a number of years and the worst thing I saw were people outlaying heaps of money on the most expensive brushes - paints etc...and half way through a class they decided that learning to draw wasn't for them..yet they had spend a couple of hundred dollars on equipment they weren't going to use again!! In a nutshell - a waste!
I also teach Jewellery making and view this as being no different!
1/. Buy an inexpensive set of pliers - even if you decide later that jewellery making isn't for you - the plier set will come in handy at some stage or another for that odd job around the house. A good functional set will comprise the following
- Round nose pliers
- Chain pliers
- Flat nose pliers
- Cutters (the most common cutter in sets are Side cutters - don't be fooled into thinking they are Flush Cutters - because they aren't. A flush cut will cut the wire flush on both sides - whereas Side cutters cut 1 side flush & the other has a "V" shape to it!)
2/. Get yourself some practise wire - the cheaper & more inexpensive the better - (I even suggest to people to get 20g fencing wire and practice with it) - There is nothing worse than spending a small fortune on expensive wire & botching the project up!
3/. Practice - Practice - Practice!!!
Also forget about buying certain jigs etc when you start up...learn how your pliers alone can make any loop - ring - shape - just by practising!! Also other tools like mandrels etc can be easily subsituted with bits of dowel - knitting needles etc. Just a simple case of using ones imagination.
To this day I still use fencing wire to make a prototype for certain projects just to make sure it will work...if not - well hey - no major expense forked out....And - I still don't own any expensive tools/mandrels/jigs etc! My partner cringes when I make a bee-line to his tool box and take off with certain long screwdrivers to use as mandrels!!..lol
The only add-ons to my tool supplies when I decided I was going to get serious about Jewellery making have been a very simple plastic square jig (cost about $10.00AUD) & a pair of plastic coated pliers(cost approx. $13.00AUD) The plastic pliers are a must when using on expensive wire as they won't leave scratch marks. The pair I have whilst cheap are still in action after 2yrs so thats $13.00 well spent in my books! In the picture are some of the "tools" I use - the strange looking contraption is wonderful! and acts as a spare couple of hands...so as not to scratch wire - I wrap the claws with thin felt. the "Mandrels" are (believe it or not!) wooden chopsticks - hard cardboard roll and the end of a craft knife that broke..lol
I am looking to start doing Tutorials soon - and will being sharing some of them for FREE!.
Happy Creating!......Suzi

